Now, for the tough part! Are you ready to test your patience?
What are we waiting for, lets start!
Please note, the setup process mentioned here is for Windows environment!


What are we waiting for, lets start!
Please note, the setup process mentioned here is for Windows environment!
Software Requirements :
- Microsoft Visual Studio (Version I am using 2012) including Microsoft Visual C++
- Python ( I have used version 2.7 - Boost.Python requires version 2.2 or newer)
- Boost ( I have used version 1.55.0)
Build Boost.Python
- Download Boost and extract it to a path in your system, lets say C:\Boost\1.55.0
- Put this into your PATH variable, so that bjam can be run anywhere within the system. (bjam is one part of Boost's own build system, called Boost.Build).
- Download Python and extract it to a path in your system say C:\Python27 Add this to the PATH variable.(To check if python is installed correctly, type python in the Command Prompt and you should be able to see the python interpreter with >>> )
- Open 'Developer Command Prompt for VS2012' (Start->Microsoft Visual Studio 2012-> Visual Studio Tools)
- Navigate to the Boost_root location(C:\Boost\1.55.0)
- Enter bootstrap to prepare Boost in building it for our system.
- Then, run b2 --toolset=msvc-11.0 --build-type=complete stage (Time for a cup of tea! :) )
(If you ever come across link.jam : No such file or directory during the build process. Dont panic and waste your time trying to resolve it like I did, its quite harmless!)
As a result you should be able to see two new directories in your Boost_root location
bin.v2 (Build directory that contains generated library files, object files and other auxillary files) and stage (contains library files alone, ready to be deployed)
Note : --toolset=msvc-11.0 tells bjam to use Microsoft Visual Studio 2012 toolkit(varies depending on your visual studio version number, for 2012, its 11.0)
--build-type=complete tells Bjam to build all possible variations of the libraries. - One unfortuante thing is, for our Python project to be successfully integrated, you have to check if C:\Boost\1.55.0\stage\lib\libboost_python-vc110-mt-gd-1_55.lib is renamed to boost_python-vc110-mt-gd-1_55.lib, else you will have to copy this file into root folder of your project.
(This annoying problem left me hours wondering what the error was!!!)
Checking correctness of our Boost.Build system installation!
Inorder to test the correctness of our installation, lets use the already existing Boost.Python example. Still in Command Prompt environment, go to C:\Boost\1.55.0\libs\python\example\tutorial You will see three files
- Jamroot : Boost.build system will use this file to build your application. It is similar to a Makefile
- hello.cpp : Main C++ class whose members are ready to be exposed to Python
- hello.py : A python code that uses the exposed information from the above class (Optional)
Run bjam (It will not work if you haven't set your PATH variable as mentioned in step 2)
If everything works fine, you will see a newly created hello_ext.pyd in the tutorial folder as a result of the build process. This is very much similar to a regular Windows DLL file but renamed into *.pyd file.(Python will not import a DLL file instead it will import only PYD file)
Test this by running python and import this new PYD file as below :
(or) since we already have an existing hello.py with the python code. You can simply run python hello.py to see the same output.
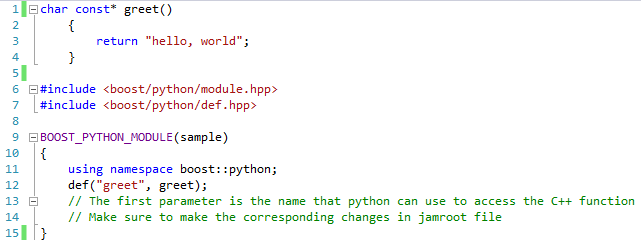
Let's take a look at what is inside hello.cpp file. I have added comments for better understanding.
Hope its quite starightforward!
So what are the corresponding changes that need to be made in the Jamroot file. Let's take a look at what's inside Jamroot file.
In the above file, I have changed the default BOOST_PYTHON_MODULE(hello_ext) to BOOST_PYTHON_MODULE(sample) for better understanding on what it does!
Take a look at the lines the corresponding changes ought to be made! If you are planning to change the name in your project, make sure to make the necessary changes in your Jamroot file as well.
Also, if your project is in some other directory and not within Boost directory, make sure you give the Boost path under use-project boost as shown above(see the first blue dot!)
Note : If the file path contains spaces, make sure you enclose the path within double quotes. This is applicable to any path you use in this project.
Eg : C:/Boost 1.55.0/tools/build/v2 then change it to "C:/Boost 1.55.0/tools/build/v2"
Also note for Windows, single backward slash or two forward slashes only are acceptable between filenames in a path.
This is it! We are almost done!
As a final reminder, make sure your project folder always has these three important files along with your C++ files :
As a final reminder, make sure your project folder always has these three important files along with your C++ files :
- Jamroot (with the corresponding changes made as mentioned above)
- boost.build (Mainly used to locate the installation directory of Boost distribution. Its contents would be : boost-build C:\\Boost\\1.55.0\\tools\\build\\v2 )
- Boost library file boost_python-vc110-mt-gd-1_55.lib
Okay! Thats brilliant! We have successfully achieved python binding with this simple module.
Now, you are good to start with your own Python Binding project.
Now, you are good to start with your own Python Binding project.
Happy coding!
Important Note :
Important Note :
If suppose you encounter an error while building Boost, it may be due to the following reason.
A file called user-config.jam may be found either in your home directory or most probably in C:\Boost\1.55.0\tools\build\v2. This file specifies where the tools and libraries are available to the Build system. If build fails, one of the many reasons might be that Boost.Build is unable to find Python and link to its corresponding libraries. You may need to edit this file to help Boost.Build find the necessary.
Add these two lines in user-config.jam and try building Boost again.
using msvc : 11.0 : "C:\\Program Files\\Microsoft Visual Studio 11.0\\VC\\bin\\cl.exe" ;
#msvc:11.0 is Microsoft Visual C++ version number, for 12 its 11. You need to change it accordingly).
using python
: 2.7 # Version
: C:\\Python27\\python.exe # Python Path
: C:\\Python27\\include # include path
: C:\\Python27\\libs # lib path(s)
: <define>BOOST_ALL_NO_LIB=1
;
Reference :
[1] 'Knowledge Base Wiki'
http://www.thalesians.com/finance/index.php/Knowledge_Base/CPP/Boost_Python_Step_By_Step
http://www.thalesians.com/finance/index.php/Knowledge_Base/CPP/Boost_Python_Step_By_Step
[2] 'Boost.Python Build HowTo'
http://www.boost.org/doc/libs/1_50_0/libs/python/doc/building.html
http://www.boost.org/doc/libs/1_50_0/libs/python/doc/building.html
No comments:
Post a Comment